silver jewelry tutorials
this space is where you’ll bring your silver jewelry to life. we’ll guide you through every step of the way - how to shape the clay, fire and polish your very own silver jewelry at home.


the main steps to work with silver clay
what you'll need to know when working with silver clay.
shaping the clay
-
touch the clay as little as possible to avoid drying it out
-
smooth cracks with a metal carving tool (or one drop of water if needed)
drying & refining the piece
-
dry the piece in the oven at 100°C for 15-20 minutes
-
the piece should feel harder and more metal-like once fully dry
-
refine details with a sharp metal tool and smooth edges with a file
-
once dry, the clay becomes fragile, so handle it gently
firing the piece
-
fire slowly with a small flame, moving in circular motions
-
expect smoke, darkening, and a matte white stage - this is normal
-
look for a soft pink glow and keep it there briefly
-
if the silver starts to look shiny or liquid on the surface, it’s melting. pull the flame away immediately
finishing the piece
-
brush with a metal wire brush, water, and soap to reveal the silver shine
-
smooth or polish further with sandpaper or file if needed
-
wear your handmade silver piece!
small imperfections are part of the process - and most things can be fixed:
-
save a little extra clay at the start just in case.
-
if your clay cracks or breaks before firing, you can almost always fix it with a little extra clay and drying - then fire as usual.
-
if your piece breaks after firing, you can still sometimes repair it by adding fresh clay (or clay paste made of a bit of clay mixed with water), roughening the old surface, and re-firing - but the result may show a small seam or thickness difference.
-
mistakes are part of the process - every handmade piece is unique.
how to make a silver clay ring
this section walks you through making a silver clay ring - from measuring your finger to shaping the ring and setting stones. take it step by step, and don’t rush. silver clay gives you time to adjust.
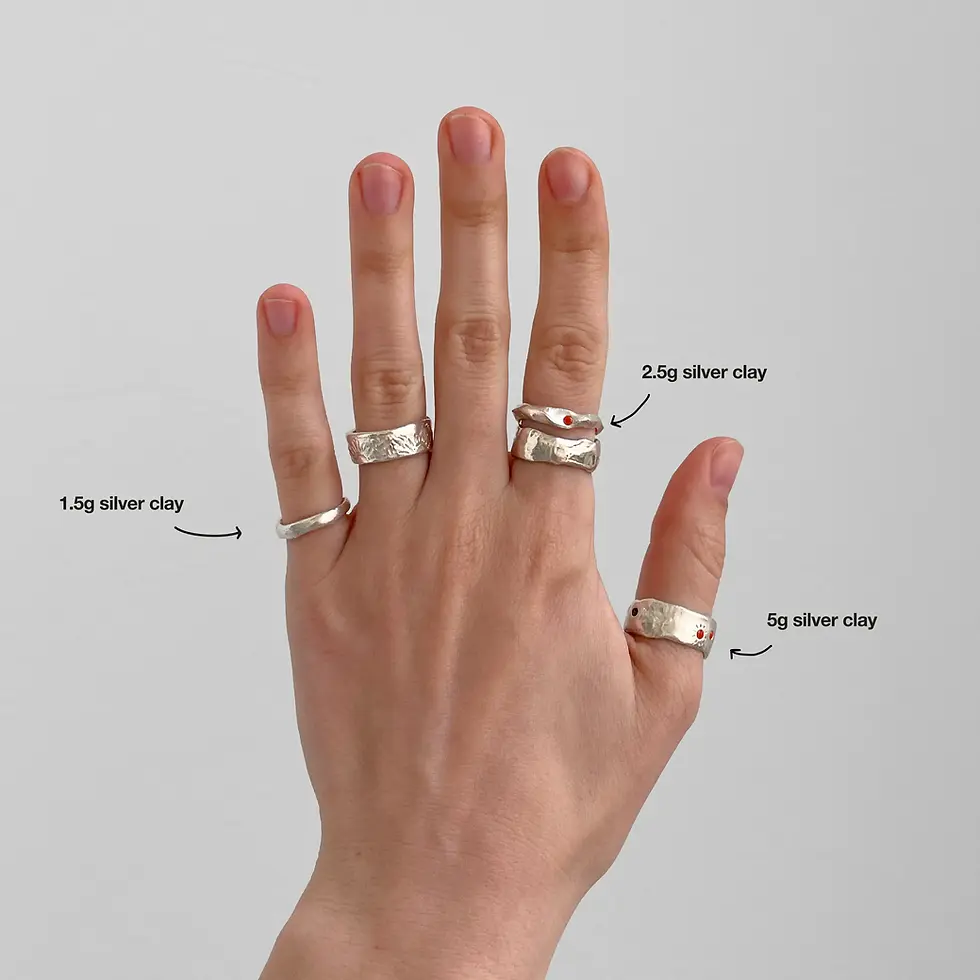
for one ring, we recommend using 5 grams of silver clay.

step 1: measure your finger
-
use a ring measuring tool and wrap it around your finger like a belt.
-
the ring sizer should sit comfortably
-
it shouldn’t slide off easily when you turn your hand upside down
-
but it also shouldn’t be painful or very hard to remove
👉 this gives you your starting ring size.

step 2: calculate shrinkage
-
silver clay shrinks ~10% during firing which means your ring will shrink by about 3-4 ring sizes
-
add 3-4 sizes to the size you just measured.
example: if your finger measures size 55, you should build your ring at size 58-59.
👉 this final number is the size you should aim to build on the mandrel.

step 3: prepare the mandrel
to make sure the ring doesn’t stick to the mandrel:
-
cut a small strip of baking paper
-
wrap it around the wooden mandrel
-
secure it with a small piece of tape
👉 this creates a barrier so you can remove the ring easily without damaging it.

step 4: mark your target size
-
slide the ring measuring tool onto the mandrel
-
find the size you calculated
-
mark it with a pencil
👉 you can draw a line all the way around the mandrel - this helps you clearly see where your ring should sit while shaping.

step 5: form the ring band
for one ring, we recommend using 5 grams of silver clay.
-
roll the clay into an even, smooth coil and check that the length is enough to wrap around the mandrel at your marked size
-
place the clay onto the mandrel

step 6: connect the ends
-
gently roughen both ends of the clay
-
add a tiny bit of water
-
use the metal carving tool to press and blend the seam together
👉 take your time here - a clean connection makes the ring much stronger.

step 7: design your ring
now comes the creative part. you can decide:
-
wide or narrow band
-
smooth or textured surface
-
minimal or expressive
-
adding drawings
-
with stones or without
👉 make sure the ring feels balanced - especially if you plan to add stones.

what comes next
after shaping your ring continue with:
-
stone setting (optional)
-
drying the ring
-
refining details
-
firing
-
finishing
-
and of course, wearing!!!
adding stones to your ring
adding stones is absolutely possible with silver clay, but there are a few important things to note.

choose the right stones
-
use zirconia (CZ) stones
-
they are heat-resistant and safe for open-flame firing
-
most other stones may crack, discolor, or break during firing

make sure the ring can support
the stone
before placing a stone:
-
the ring must be wide enough
-
and thick enough to hold it securely
-
very thin bands are not suitable for stones.

set the stone without glue
just like traditional jewelers, avoid glue before firing. instead, the stone must be held mechanically by the clay:
-
a raised edge or line of clay around the stone
-
small “claws”
-
or tiny clay supports (“legs”) that slightly overlap the stone

dry and fire as usual
once the stone is set:
-
dry the ring fully in the oven at 100C for 15-20 minutes, just like any other silver clay piece
-
fire it following the firing steps (see above)
the ring will shrink during firing, but the shrinking will not damage the stone when it’s set correctly.

after firing: if a stone comes loose
sometimes, despite everything, a stone may loosen after firing - this can happen.
in that case:
-
you can carefully glue the stone using a small amount of strong jewelry-grade super glue
-
apply the glue sparingly and let it fully cure

polishing
-
once the ring is fired and cooled, use the metal wire brush with water and soap
-
brush to remove the matte surface and reveal the silver shine
-
be gentle around the stone
-
finish with the polishing strip for extra shine
-
and now you can wear your very own masterpiece!!